Updating my Vanity
As you probably know, I've moved recently (twice!) and because of this some of my furniture was damaged. Luckily my good/antique furniture is fine, but some of my cheaper (aka almost wood) pieces got pretty scratched up. So I thought it was time to try out some DIY.
I had this idea to use contact paper to revitalize my desk-turned-vanity with a marble finish. I wasn't quite sure how to go about it, where to find the paper, or really my plan. But, one day while strolling through Big Lots I found a blue marble contact paper for about $3... so yea I had to get me some o' that!
So I got my stuff together and just went for it! Take a look below at my process and the really cool results :)
![](https://blogger.googleusercontent.com/img/b/R29vZ2xl/AVvXsEhQPFLkmPtcHG51sP9H1K8i-b1CYU3tVZ0MyxOF5Hp6jKpUo8Gz12IORgJPhgtwQmPfCrGFak8l_Ie7ATaVfNzbQpP-RnHd3Gl8O6lvBZu4n8xwnhvNDZ3AXTgx1O0iezpx7LVC7UV4YLYZ/s400/2011-06-04+15.32.37.jpg) |
Here is the vanity before hand |
![](https://blogger.googleusercontent.com/img/b/R29vZ2xl/AVvXsEjUpAxvI2W-XsbdL9r7-QWMqM_JtOhpGIVhjpcGBqDWk9uMjQ_Z4GkbX5vhp6LvJgbxSUGf-8Il_ggVIT-9u7svud6GkVXJbiyEFFtzhu_Do-zTkZhwzhu2tMGGLbaHbC9EJlTMGKw33En1/s200/2011-06-04+15.jpg) |
And the crazy scratches from the moves, they're all over! |
![](https://blogger.googleusercontent.com/img/b/R29vZ2xl/AVvXsEgGWaQNj3s53kcnaT_TqFxEYoMXGi4_BNc_nQSzPk05S3BDexoAVE04sze46DWCpDqmdL_WPvANV92VmnaOxPbtthw2KuET3GSr7PJRA_nWFC2oyzYrz0x_5gMEbNTVCbSfAuOMUKRUYU4H/s400/2011-06-04+15.34.53.jpg) |
Got my supplies together, oh and some tape to help keep things still. |
![](https://blogger.googleusercontent.com/img/b/R29vZ2xl/AVvXsEjAuYhPFlXDxcsH6b-AIKo8OqXwrTfyKp90reMdxXoOQVV3awpueRAIk7xduZrfCG-YT3CZLoPdIX7w1arFdHcb83q6aToULb9GVEOVSGSrSV4rIYKRhElJfqU3ZFGi8iq66tpNs35dxDvY/s400/2011-06-04+15.37.18.jpg) |
I laid the contact paper out |
![](https://blogger.googleusercontent.com/img/b/R29vZ2xl/AVvXsEgot_WUXef0hPMgv16jeSWLc0P_w6q4WD7X8CZo3YdP8clZhplQoQqE7lBXlnHooy24Y9tXn_wXQsbeb9wyvZTkvz4sCjgNExNADii6Y8nHV_Mbk0DtkonXlOxv_QH1V7PWxy3IMuriw1p-/s400/2011-06-04+15.38.46.jpg) |
And hung it over the edges about a 1/2 an inch |
![](https://blogger.googleusercontent.com/img/b/R29vZ2xl/AVvXsEjl4DHKN8fDzjRus7aJXB2JfO18J-4EZO-IQwSjNZnLc84q0aF9NJG3SQbV2lmLmpEmKySOzQaiDsZPA3r83Uy3yKBwMz_RV8rVocQv2WoBhgDUuJpm26oMX3lg6XNPpJrzApdxlkdJN4rb/s400/2011-06-04+15.47.35.jpg) |
Once everything was lined up I started sticking |
![](https://blogger.googleusercontent.com/img/b/R29vZ2xl/AVvXsEjSia7yWsrQVzvtcbvZD7JFgyUzZjO0vjUyucMWJraM0y4YILhmmbA5l8mKLUL3MFedBGmBPY5xy4R5S_LfOKsFLa31ZZZwLkk6_Yff-KESYsHkJrFrBxU1PbKhYOfB-NZo5hL6dPbocgZ5/s400/2011-06-04+15.48.37.jpg) |
This is the awkward way I unrolled and laid it down while smoothing lumps |
![](https://blogger.googleusercontent.com/img/b/R29vZ2xl/AVvXsEhi4snwKuTKhNdtoJPmRwZmAYp5HgmWH5PKvVnS7mlFWG3YSnjG4mk2wejGQu6tgymbFXyBxXhRcvPFluR45hI1vK8nWng3bVdwi0mp5_B_A9LG-Ek-1vGcJcGwy8Y02Jsf0DN6Il-hU-58/s400/2011-06-04+16.10.25.jpg) |
Then I trimmed the edges with a utility knife |
![](https://blogger.googleusercontent.com/img/b/R29vZ2xl/AVvXsEiQ9pPyFIh_DRnKcEKszn-ctnCBn0Iign4_cnWYumnZXHwe7rQPY7Gy5Im8vkZjOafmsplohepIDlgMWnjwq3vGziP2F1bVZ90DUC1q0p1IujfhlyJTKTp7rAB_MXHCiVDJqIJyHofzNq-n/s400/2011-06-04+16.11.58.jpg) |
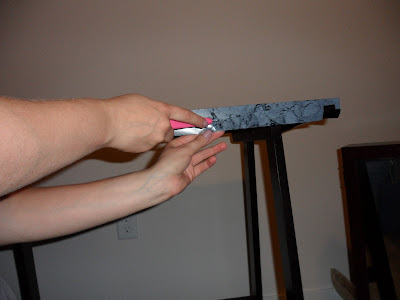
Yay! Awkward hand pictures! |
![](https://blogger.googleusercontent.com/img/b/R29vZ2xl/AVvXsEhX7xFXM94wZHjI3Cm_IQvQMxPSh8I9xf-uI2TQKncBfbeatEaszhzbPjBWdZEjqR8jVPfnKku5JcSlZ9RtL5HNuBPtsI4lGNTJqNIwYNs-5j-8zua7jCbsEmYscLvw1CeMsdveOZ6AYWWt/s400/2011-06-04+16.16.24.jpg) |
And it's done! |
![](https://blogger.googleusercontent.com/img/b/R29vZ2xl/AVvXsEg864pg8G4QnS2vYhN5_uuT86_BCOgWn0pt03mx0JAA173v0sgS_0k6tC3pDnHtUY5EUegqu2KAMOVZ5DMPOaeLT8rgJNrnvmdOM4OFNE7CpWohGfWtMfiho9yzq4-v9dGE0hg33wz0Vk0D/s400/2011-06-04+16.19.58.jpg) |
And the final product, I love it :) |
Overall for around $3 the turned out great, I love it and it just adds something extra to the room and the table. I hope you all get some inspiration because as DIYs go this one was easy!
Major style and character, nice work!!!
ReplyDelete